Every homeowner can imagine the perfect kitchen. But what does it look like? Is it just the floors and the stove that make it look good? Of course not! There’s nothing more aesthetically pleasing than a row of kitchen cabinets, perfectly aligned around the room. Not to mention all the space they provide for storing your kitchen essentials.
However, these cabinets didn’t get in your kitchen on their own. Somebody installed them, and if you’re reading this, chances are you are wondering how to do the same. Anyone can learn how to install kitchen cabinets, despite it looking like a challenging task. There are many things to consider, though, other than colour and style: proper position, alignment, measurements of the available space, etc.
In truth, it isn’t at all hard to install kitchen cabinets. This guide is for you if you want to:
Improve your DIY skills;
Breathe new life into your old kitchen;
Satiate your crafty enthusiasm;
Handle your kitchen renovation on your own.
Then all you need is the right tools, a day off, and some DIY motivation.
When you decide to install your own kitchen cabinets, you should first check if you have the right tools for the job. Fortunately, this endeavour doesn’t require anything special. Essential household tools found in almost every garage or backyard are more than enough. If you’re missing any tool from the list – you can always ask your neighbours if they have it. The required cabinet installation tools are:
Level – at least 1m long
A framing square
Tape measure
A screw gun
A pencil and a piece of chalk
A ledger board – to hold the upper wall cabinets while you work
A screwdriver
A drill
Screw clamps – to tightly adjust the kitchen cabinets close to each other
A box of mounting screws – 6cm to 7cm screws would work best for almost any kitchen cabinet installation.
Clamps
A box or two of shims (depends on the number of cabinets) – to help level out any uneven parts of your complete kitchen look.
A belt sander or a block plane – in case your cabinets need some fine-tuning to fit better.
A utility knife
A laser level is the best thing you can get in terms of measuring prowess. Of course, laser levels can be quite expensive, and it’s not worth buying one just for a few cabinets. But if you can get your hands on one – definitely use it! If not – a regular level is good enough!
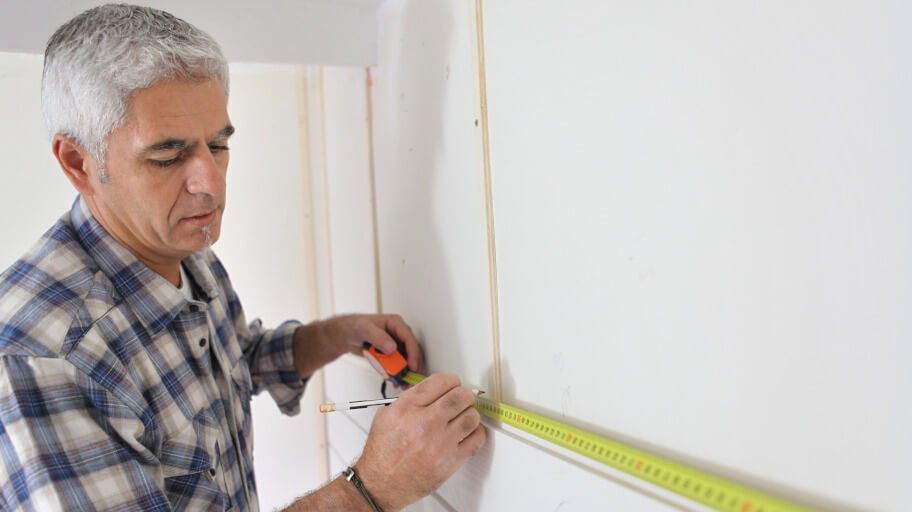
Prepare the room
Phovoir / Shutterstock.com
Unless you’re furnishing a brand new kitchen, chances are you have old kitchen cabinets that need updating or thorough replacing. If that isn’t the case and your kitchen space is already free, skip this part and proceed to the measurement and preparation section. However, if you need to remove your old cabinets, then here is how to do it.
Remove the old kitchen cabinets (in case you have any)
Turn off any electrical appliances you might have on your kitchen counter or inside your cabinets and put them away. Next, turn off the electrical supply to your kitchen altogether. Then, turn off the water and gas supply lines. Before you start unscrewing your old kitchen cabinets, take out all the drawers and shelves that aren’t screwed in. This will make the whole kitchen cabinet lighter and easier to take out.
Remove all your appliances and start disassembling the doors of your old kitchen cabinets. Take the doors off and unscrew any drawers or shelves that are tightly screwed in. Once you’re ready, remove the screws from the face frames of the cabinetry and then the ones in their backs, which keep them glued to the walls. Finally, take your old cabinets out and take them away.
Prepare the area for measuring
Proper space measurement is the most crucial part of learning how to install kitchen cabinets. One wrong measurement can take you back to the drawing board. So prepare your level, put that pencil behind your ear, and let’s get started.
Prepping the area step-by-step
1
First off, take your level, framing square, and pencil.
2
Check your kitchen walls, corners, and flooring.
3
Mark any uneven areas in the walls and corners. Bubbles, dips, or bad angles will need adjusting, either by sanding or using a shim, so make sure you don’t miss anything.
4
Prepare your electrical supply line and install as many sockets as you think you’ll need for your kitchen appliances. If you have any older sockets that you want to keep using – make sure their positions align well with the dimensions of your new kitchen cabinets, so you save yourself the trouble of lousy cable management.
5
If you notice any damage to your flooring, repair it before you proceed any further.
Take your level, framing square, pencil, and chalk.
2
Using your pencil, draw a level, horizontal reference line about 1.2m above the floor. The reference line should go along the walls, covering all the space where you plan on putting your kitchen cabinets.
3
Once you have drawn the reference line, split its length into 30cm-long lines and use the chalk to draw a vertical line down to the floor. Using this method, you can establish the high and low points of your kitchen floor.
4
Mark the shortest chalk line – this is your kitchen floor’s highest point, and that’s the point you will use to adjust the height of your cabinets with shims.
5
After you establish your floor’s high point, go back to the reference line above it and mark the height of your base kitchen cabinets. The average height for kitchen cabinets is about 90cm off the floor, but make sure to double-check the ones you have and adjust the markings accordingly.
6
Now that you’ve marked the height of your base cabinets, extend a level layout line along the walls – to achieve a perfectly levelled kitchen layout, you’ll need to follow that line.
7
Next up, measure the height of your upper kitchen cabinets, decide on how much space you want to have between your upper and lower cabinets, and mark it. For example, your upper kitchen cabinets are 50cm tall, and you want at least 50cm of space between the top and bottom layouts. Mark a 1m point right above your level layout line and extend that into another level layout line – your upper cabinets will go along it.
8
Unpack your new upper kitchen cabinets and find the studs that will keep them in place.
9
Using your level and framing square, measure the exact positions where the studs will stay as well as the points where you will need to drill holes for their screws. If you’re eager to use the screw gun, you can drill small holes at the locations for your studs right now, or you can wait until you get to the cupboard hanging part of the guide.
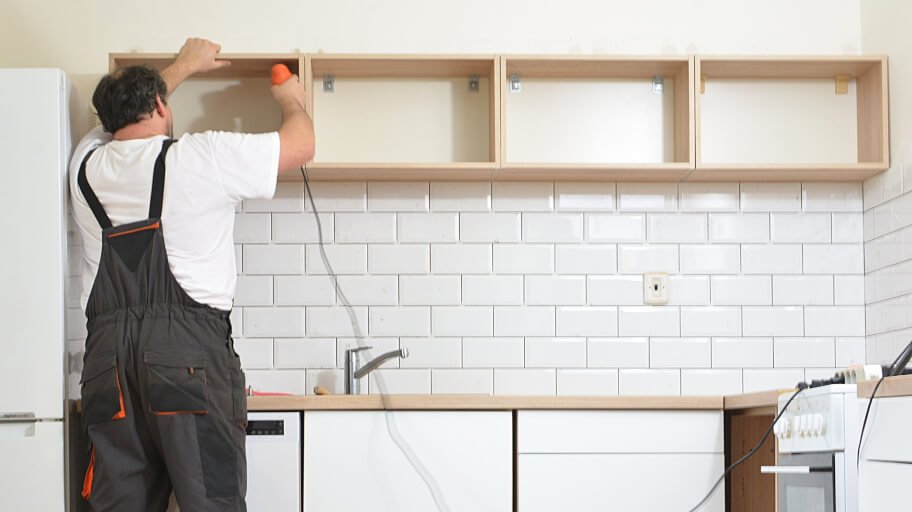
How to install wall cabinets
brachostudio / Shutterstock.com
Mounting kitchen wall cabinets step-by-step
1
Start by removing any drawers, shelves and cabinet doors. You can add them back later, but for now – it’s better if you make your job easier by reducing the weight of your upper cabinets. Remember to label the elements you take out so you know where each of them goes when the time comes to reassemble.
2
Use the screw gun to drive screws into every stud the position of which you marked earlier.
3
When done with the studs, place your ledger board to support the top kitchen cabinets while you work on putting them up.
4
Drill holes at the backs of the cabinets along their top, middle, and bottom rail. Ensure the holes aren’t too close to the cabinet edges. Even weight distribution is crucial when the cabinet hangs on the wall. A good rule of thumb is to drill your holes at least 2cm inward.
5
Choose a corner hanging cabinet, or if there isn’t one – start with the one that’s supposed to go on the far left side of the kitchen, then work your way around to the right side. On the off-chance that your left hand is your dominant one – do it right-to-left.
6
Mount the first cabinet in its place and start driving the screws into the wall. Remember not to overtighten the screws – just drive them deep enough to hold the cabinet in place. The reason for this is simple – you don’t want to fasten your cabinets all the way until you’ve mounted all of them and you’re sure they are in the correct position.
7
Make sure the first cabinet is level and in the position you want it to be, then take the second cabinet and mount it next to the first one. Remember to consider the kitchen cabinets’ face frame when you align them next to each other.
8
Next up, use clamps to tighten the second cabinet beside the first one while you screw it in. If your wall isn’t perfectly flat, you can start adding shims in the back of the second and subsequent cabinets to make them plumb.
9
Without removing the clamps, repeat the process until you finish hanging the cabinets in the upper part of your kitchen.
10
Start drilling through the cabinets’ face frames one by one and connect them with their cabinet screws. Remember to only drill through the face frame, and place cabinet screws right after you finish every hole. Check the cabinets’ alignment after every screw you tighten.
11
Once you finish drilling and screwing the cabinets together, do an alignment check. Do they look level? Do you like the result so far? If so, you can fasten the mounting screws on their backs and take a small break because you completed the more challenging half of the job!
Now that you’ve finished hanging cabinets, it’s time to move on to the next part – installing the lower kitchen cabinets. Double-check your measurements before you start, get your tools, and follow the steps:
Install lower kitchen cabinets step-by-step
1
Start in a corner or on the left side. Using your earlier measurements, place the studs and transfer their locations to the back of their respective cabinets. Don’t forget to consider the face frames.
2
Use the horizontal line you first drew on the wall as your guide and align the first cabinet to it. Once you do that, screw it in, but don’t fasten it too tightly – just enough to hold it in place.
3
Place the second cabinet next to the first one and repeat the process of positioning it before you drive the screws in. Remember to even out the cabinets’ faces and clamp them together. Use shims if necessary.
4
You can drill holes through the face frames of lower kitchen cabinets and screw their face frame to their adjacent cabinet as soon as you position it. Keep all screws a little loose so you can readjust them along the way if you need to.
5
When you reach the part of the kitchen where you plan on having a sink – take the cabinet that will house it and make adjustments to its backplate. You will probably need to cut a few holes for plumbing or waste disposal.
6
Continue placing, shimming, and screwing cabinets in until you put the last one in place. Then take your level and check each one. They should fit the wall behind them perfectly, and their countertops should blend into one another.
7
Use shims to adjust the cabinets’ height relative to each other and fix their positioning relative to the wall behind them. A pro tip to help you even out the cabinet tops against walls is to put shims under the cabinet base, right next to the wall behind the cabinet.
8
After you finish all the micro-adjustments, go ahead and tighten all the screws. Start with the ones on the cabinet backs, then the ones on their face frames, and last, but not least – remove the clamps.
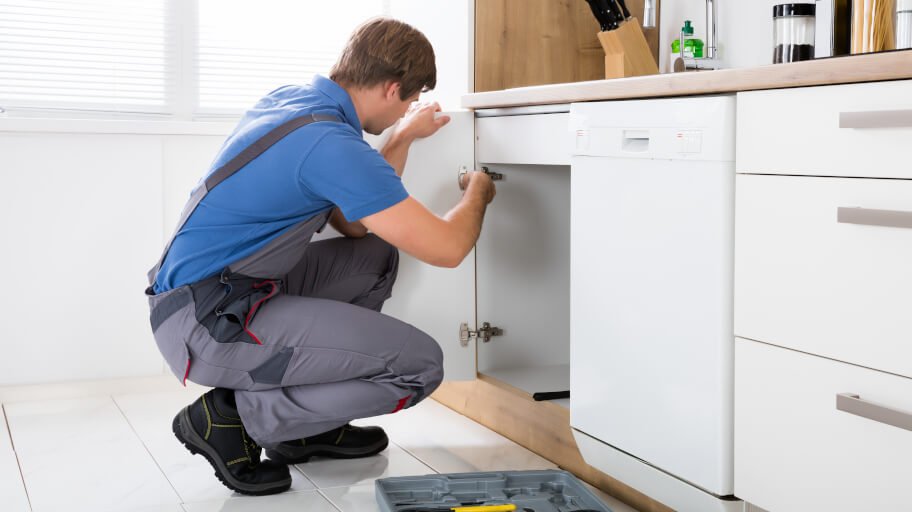
What to do after setting your new kitchen cabinets
Andrey_Popov / Shutterstock.com
There are a few things you should do to finalise the process before you enjoy your newly-furnished kitchen, including, but not limited to cleaning up the kitchen.
First of all, it’s a good idea to place back the drawers and doors you removed before installing your kitchen cabinets. Next, check if the door hinges need adjustment – can the doors open and close properly? Do they hang off? You can make small adjustments to your cabinet doors with a screwdriver. They should have different screws for vertical and horizontal alignment. Decide which one you need to adjust to fit the cabinet doors properly.
Next, unscrew and reposition the hinges. Then test if their new positions allow for proper door movement. Once you find the correct position, fasten the hinge screws, but do not use a screw gun. Instead, you should fasten your kitchen cabinets’ hinges by hand.
The reasoning behind this is simple: a screw gun could quickly over tighten the hinge screws, or worse, strip their heads, making it difficult for you to readjust the doors in the future. Of course, if you don’t feel up to the task, you can always contact a professional and ask them to do it for you!
Why sacrifice a whole day off to install kitchen cabinets?
Call a professional and let them do the job instead!
We're certified:
Takeaways
Cut off the electricity before you start – this is non-negotiable.
Measuring is a critical part of the process – take extra care.
Always drill and screw cabinets next to their neighbour through the face frame.
Don’t be afraid to use as many shims as you need.
Keep checking the alignment of your cabinets after each one you place.
Don’t hesitate to seek professional help if you find the task too challenging.
Did you find this article helpful? Let us know in the comments section below!