
Tip: Make sure to wear a protective mask, goggles, gloves.
Painting a fence with a spray gun or a roller is easy, and anyone can do it. All it takes is the right tools, some paint, a bit of preparation, and the courage to get your hands dirty (protip: wear disposable gloves). If you have noticed that the colour of your fence has faded over time, then perhaps it is time to roll up your sleeves and get this fence painting project going. In this post, we will tell you all about how to paint a fence, such as:
Besides, have you ever used a spray gun before? It’s so much fun and so satisfying to watch. You can go on TikTok right now and watch a million spray gun painting jobs. That will surely motivate you. But painting with a roller or a plain old brush is lots of fun as well!
Hold your horses! Before you start painting, it’s important to prepare your fence. This step is crucial. By preparing your fence, you ensure that you will do a good job. Here are the basic steps that you need to follow.
Be it a metal or a wooden fence, go over it with a metal brush. The purpose of this step is to even out any rough spots and chipping old paint. If you just ignore this step and paint it as it is, you will end up with a finish that looks uneven. So take the time to smooth out the surfaces.
If you are dealing with an old metal fence with rusty spots, then you should go over it with fine sandpaper to make the surfaces even smoother. This will remove some of the old paint as well as any uneven rusty spots.
Use a dusting brush to remove the fine dust from the fence. A damp cloth will also do the trick. But if you are painting a wooden fence, then it would be best to have it jet washed. Your garden hose will also do the trick.
Take a close look at your fence. In case you notice any damage, it would be best to repair it before the painting job.
You don’t want anything in your way when you are painting, so clear the area around your fence. Remove any bikes, outdoor furniture, pots, and anything else that you can relocate.
Painting a fence can be a messy job if you are not particularly experienced. That is why it’s important to protect the surfaces and areas that the paint is not supposed to reach. So consider your surroundings. Cover those areas and surfaces with drop sheets.
To paint a fence with a roller, you will need a brush as well. The roller is great for swiftly going over flat smooth surfaces, but it is bulky, so you won’t be able to reach some spots with it. This is where the brush comes in handy. It allows you to work on the details so you can get that complete finish that you are looking for.
Also, remember to choose the paint appropriate for the type of fence you are painting. If you are painting a wooden fence, then opt for outdoor acrylic latex paint. For metal fences, choose an outdoor oil-based paint.
Metal fences such as Colorbond, which are usually made from steel, or types made out of aluminium, are generally very smooth. All you need to do is establish a pattern of painting and follow it to achieve a smooth look.
Make sure to mention the square footage of your fence when you go to purchase some paint.
The amount of paint you will need depends on the size and dimension of your fence. Paint suppliers are experienced, and they will recommend just the right amount of paint that you’ll need. If you fancy doing a little bit of math, you can calculate the litres with this formula:
Multiply together the length and height of the fence, then multiply by the number of coats of paint, then divide this by the m2/litre number you’ll find on the paint can.
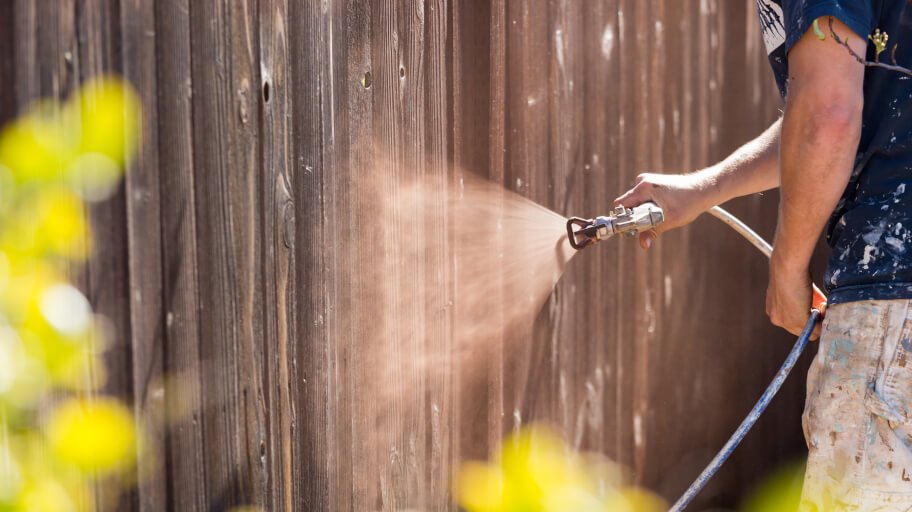
Painting is a lot more fun when you have a spray gun. This method is very efficient, but it takes a little getting used to. If you are wondering how to paint a metal fence quickly, such as Colorbond, or some kind of aluminium type, then you might want to reach for a spray gun. This is because spray guns are best for painting fences made out of wide solid metal segments. You can still paint an ornamental fence with a spray gun, but you will have to change its setting (if possible) from wide to narrow spreading of the paint so as not to waste any paint.
To paint a fence with a spray gun, you will need:

Make sure to wear protective goggles and a mask. You don’t want to accidentally end up with paint in your eyes or mouth.
another clean empty container. This step is necessary in order to ensure that lumps won’t end up in the paint tank of your spray gun. It’s a very common issue, so stir well. When your paint is ready, load the tank of your spray gun with it.
To learn how to spray paint a fence, it would be best for you to practice on a piece of cardboard. Give it a few shots using the spray gun. Move the nozzle downward and then press the trigger of the spray gun to apply an even coat of paint over the cardboard. Repeat the motion to become used to the application method. Also, note what would be the optimal distance between the nozzle and the cardboard to apply an even coat of paint.
So here’s how to paint a fence with a sprayer. Start from one end of the fence. Lift your arm holding the spray gun and place it just above the top of the fence. Move your arm downward and press the trigger of the gun. Always move your arm first, and then press the trigger. Move the nozzle of the gun from the top to the bottom end of the fence. Take a moment to examine how you did and adjust your next move. Do your best to coat the entire fence with paint evenly.

Need help painting a fence or anything else? Contact us for a convenient painting service and let the experts handle this time-consuming task for you!
So, are you an experienced DIY painter yourself? Do you have any particular tips and tricks on how to paint a fence with a spray gun or a roller? Leave a comment and tell us about your experience.


The only home improvement newsletter you will ever need!
We will never spam you. Pinky promise!
For more information, check out our privacy policy.


